Climate Change and Renewable Energy
Our Climate Change and Renewable Energy class has now ended.

Our Climate Change and Renewable Energy class has now ended.
Several people have asked me recently whether floor insulation is worth it. It’s tricky.
First, let’s look at heat loss from the house during winter and compare your ceiling to the floor. Assuming your house is at 18 degrees, the ceiling will be around 20 and the floor around 16. The ceiling space will average 12 degrees while the underfloor will be around 14.
If the floor space is well ventilated it may be less, if you have heating ducts it will be more.
So the temperature difference across the ceiling is 8 degrees, across the floor it is 2 degrees. So insulating the ceiling is much more useful.
Also, it is much easier (and cheaper) to add ceiling insulation than floor insulation.
Now look at summer. Roof insulation works well to keep your house cool, but floor insulation works against you. The sub floor is normally cooler than the house so the floor cools the house. Insulation reduces this cooling effect.
There is another side to the problem, that of comfort. The floor is the coldest place in the room and your feet may be cold so you turn up the heater. Alternatively you keep your feet warmer.
You can wear thick socks. You can stop the floor ‘sucking’ heat from your feet by putting down a floor rug. You can place a piece of underfelt under the rug. You can even buy a ‘foot warmer’ that uses only around 20 watts.
So, I would concentrate on the ceiling. Fill the gaps between the batts, make sure the insulation is even and add another layer of batts. Only then is it worth looking at the floor and even then it is only economic if you can get cheap insulation and install it yourself.
We’re going to be spending lots more time at home over the next few months and we may not be able to escape to warmer climates so let’s look at staying warm at home.
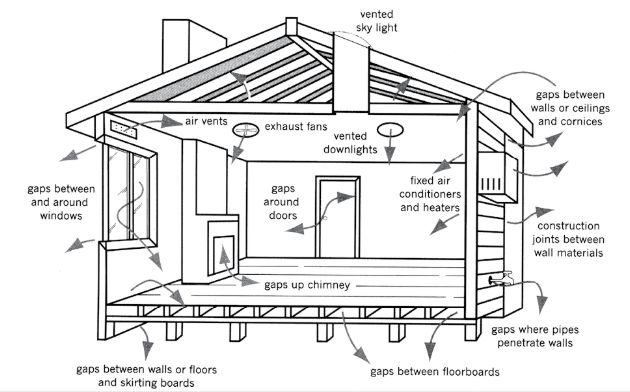
Draught proofing is the simplest upgrade and very effective. It has a good financial return and can reduce energy costs by as much as 25% in winter. The gaps in a typical Victorian house are equivalent to leaving a door wide open.
 Gaps around wall penetrations (pipes, conduits, power outlets, switches, air conditioners and heaters.
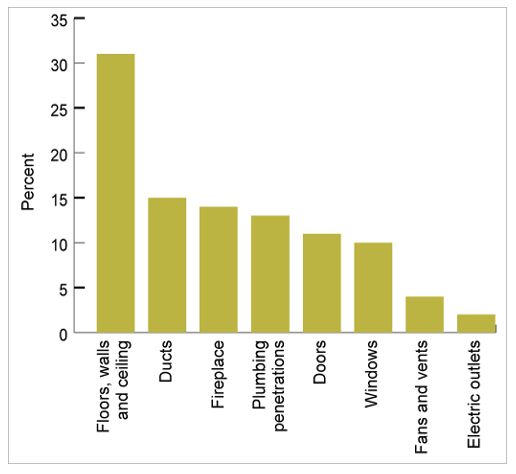
The main sources of air leakages in the average Victorian home are as shown in the graph on the right.
It is a task of identifying the gap and progressively fixing them, starting generally with the largest and moving towards the less obvious ones.
One of the best ways to identify leakage and poorly insulated areas is to use a thermal imaging camera. You choose an externally cold day, heat up the house (so the differential temperatures are large) and progressively move around the house taking photos of all the areas and thus identifying the problem areas.
You may be able to borrow a camera from the Library or Council but there is a degree of skill in interpreting some of the findings so I would recommend using a group like the Montmorency Community Group (who charge a small fee). Alan Cuthbertson, a U3A member and environment presenter, is extremely knowledgeable with the camera and understanding the results. (physical distancing currently may defer any reviews)
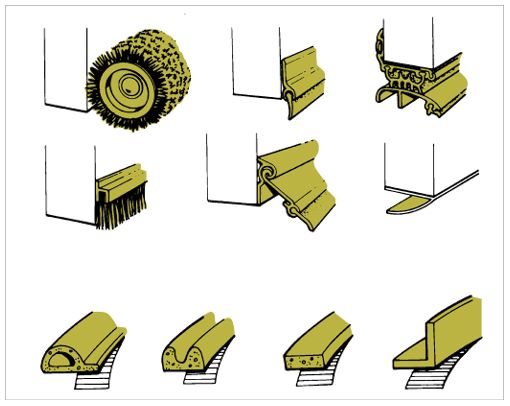 Sealing around doors and windows
There are many products readily available at Mitre 10, Bunnings, etc at low cost which can be very effective. Draught-proofing strips are available in multiple sizes and configurations to fit almost every variation.
Ceiling level leaks lose the most heat whilst floor level leaks create more discomfort for occupants (and often confuse thermostats)
Retractable draught seals at the bottom of hinged doors are effective. Overlapping brush seals allow full movement of sliding or double hung windows.
 Self-adhesive neoprene strip seals (bottom left in the image) are effective on casement or awning windows. Don’t use the foam strips as they fall off after a short time.
Doors are harder. Sometimes the rubber seal will fit, but usually the gap varies for different parts of the door. You end up with it too tight in one place (and the door won’t close) but with gaps in other spots. There are two solutions to this.
The simplest and cheapest is a clever V shaped plastic that attaches to the frame and the door slides passed it. It is called EcoSeal.
 The second, more expensive, solution is a seal that is used in all better quality windows and doors. The rubber seal fits into a square piece of wood and is then attached to the outside of the door jam. It is attached when the door is closed, following any curvature of the door. It therefore seals perfectly, even if the door is bowed. This seal is not available in shops, but Alan Cuthbertson will supply the seal and piece of wood at cost price, $25 a door.
Automatic door closures for all external doors and to unheated areas are worthwhile.
For longer gaps and cracks, there are many flexible caulks and seals (insulating strips, tapes) or one can use expanding foams. The easiest to use comes from Bunnings and is called ‘backing rod’. This is like long foam spaghetti and comes in 5mm, 10mm and 15mm diameters. Each can be squashed into a gap half of its expanded size. The beauty is that if it doesn’t work it comes out easily and you can retry it. Good for cracks in floor boards.
With expanding foams, be careful not to over-pressurise the area with too much foam.
In older houses (pre 1990ish), seal off permanent air vents (originally required in case one used a gas heater without an exhausting facility to the outside). It is much better to control the ventilation requirements by opening doors or windows or via a heat recovery system.
For duct exhaust fans, install a non-return baffle. In bathrooms fit a ‘top-hat’ (available at hardware stores) if one feels capable of accessing the loft. It opens when the fan is operating but drops back and seals when it stops.
Many homes in the seventies had a 10cm vent at the top of the window in the toilet. This allows a lot of air to enter and leave the house and is best covered over. Use a piece of cardboard if necessary. If you need to vent the toilet because of smells, open the window for a while.
Many people leave a window permanently open to ‘air the house’ during winter. A far more effective way is to close all the windows and then open them for 30 minutes mid afternoon. At this time, the outside air is warmer and so you lose less heat from the house.
The traditional vented skylights are effectively chimneys and exhaust heat outside. They require a diffuser at ceiling level and I’ve made a double diffuser unit with a small gap between the levels and sealed with foam onto the support frame. A self closing exhaust fan should be installed if you need to exhaust heat during the summer (but it’s best not to let it enter in the first place).
Light tubes are much more effective as they are sealed (around both entry and exit and the tube itself) and the light can be directed some way horizontally if needed.
Note that, while skylights used to be a good way to get light into the centre of the house, an LED light is now much better. You can replace a skylight with a 9 watt LED and get the same light. The energy saving from replacing a skylight with a well insulated ceiling is much greater than the 9 watts to drive the LED light. You can even buy a small solar panel to drive the light!
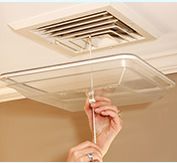 Evaporative coolers are generally very poor in winter as they permit large quantities of warm air to escape up the ducts. One can get a plastic sealing tray with a pull string closing clip which one can put onto the ceiling vents (see the image). Remove the tray in summer.
The floor (and ceiling) registers are a common source of air leaks. They need to be sealed around the register – with self adhesive sealing strips and/or bulk insulation.
It is common for any insulation to have been removed when the penetrations were made for these services. Frequently the holes are excessively large for the pipe/ cable so one needs to put back the insulation tightly up against the cable / pipe and then seal the hole up tightly.
Electrical switches and plugs are problematic as usually one has very little room to work in and one has to be able to remove the unit for maintenance. During the initial installation, it is easy to wrap each one in the cavity with a breathable building wrap but I’ve found that’s not easy afterwards.
One needs to fix insulation to the top of the hatch cover and fit air seals around the edges with self adhesive tapes or similar.
I’ve made a double flap so it is a sort of ‘double glazing’ with reasonable seals.
Thse are not common here but in the UK they often put a carpet flap on the inside. This can work well and the postman quickly learns to push the letters through a little firmer.
Open chimneys are a huge heat loss zone and should be sealed up if not used. There are chimney draught stoppers (thick polystyrene type material which is easily cut to size) or chimney balloons. Balloons need to be checked regularly to make sure they have a tight fit and need to have a visible ‘flag’ hanging down so one doesn’t try to light a fire when it’s in.
I’ve filled the gaps by forcing in ‘spaghetti strips’ and covering them with a plastic wood to get a reasonable color match.
If one can access underneath then underfloor insulation is effective with good seals at the joints. It can be a very strenuous job when there’s limited headroom.
